
Do you have a list in Excel that you would like to import into Zoho CRM? If your administrator has not restricted your ability to import, the process is fairly easy to accomplish, but understanding the options can make everything go smoother. Watch the video showing how you can import data into your own Zoho CRM database and/or use step-by-step instructions below the video.
First you may need to prepare the spreadsheet
- Remove any extra rows from the top of the spreadsheet, like titles or blank lines. Row 1 should be the column headers. Row 2 should be where the data starts.
- Make sure that there is a column for any required fields and that it is populated. For example, if you are importing into Leads or Contacts, the “Last Name” field is required. Depending on how you set up your Zoho, “Account Name” (or Company Name if you are importing into Leads) may also be a required field. You can tell which fields are required by looking at a record in Zoho. Fields with red labels are required. Any records in your spreadsheet that are missing a required field value will be skipped on import.
- If there are any date fields in your spreadsheet, make sure that you format all date fields with a 4-digit year (mm/dd/yyyy hh:mm). Dates not formatted in this manner will not be imported. (Get more tips below on how to clean up your spreadsheets for importing.)
- Once you have the list, you can clean it up to delete records that you really don’t want to come over to Zoho. You may want to rename some column headers and delete other columns that won’t be relevant to Zoho (e.g. Initials, ISDN, Telex, Directory Server, etc.) Definitely look at the values in the columns and then consider renaming the column header to indicate what Zoho field it should import into. For example, is the Account Name stored in Company or another field in the export file? The field names don’t have to match, but it makes the import go more smoothly.
- IMPORTANT NOTE: Zoho changed their import mechanics a year or so ago. Zoho no longer automatically creates the Account from a Contact import. When importing a spreadsheet into Contacts (this is not necessary if you are importing into Leads), if the Account Name is not already in your Zoho Account, the Contacts will import with a blank Account Name. So, you now need to Import the file into Accounts first to create the Account Name BEFORE you import into Contacts (when importing into Accounts, be sure to select the Add option based on Account Name so that only new Accounts are added to the database without disturbing the existing ones). You will eventually get an error message about duplicate records being ignored, that is just the ones from the spreadsheet where you had multiple Contacts associated to the same Company. Just ignore the message.
Ok, you are ready to import.
Import your data into Zoho CRM
- Click the module you wish to import into (e.g Leads or Contacts or Accounts. You cannot import into Activities, Quotes, Sales Orders, Purchase Orders, or Invoices).
- Click the Import button at the top right of the module List view.
- Select the first option to Import [module name].
- Click the From File option (NOT ‘From other CRM’s’)
- Click the Browse button (or use the Drag and drop option) to search for and select the file to import. Click the Open button
- Click the Next button when the file has been uploaded successfully.
- If you have created multiple layouts for this module, use the drop-down to Select layout to import to use for the import
- This next option has 2 parts. Identify which records to import and identify the field (Skip drop-down) that you want Zoho to use to identify matching records. First select which records:
- Add as new [module name] – Zoho will import the list as new records. If a record already exists in Zoho, it will be skipped.
- Update existing [module name] only – Zoho will import the list and only update existing records based on the ‘Skip…’ field option you select. When you select this option, you many need to break up your import into multiple files with 5,000 or less records each.
- Both – Zoho will import the entire list. If a duplicate record is found it will update the current record in Zoho. If the record is not found, a new record will be added.
- Then, Find existing [module name] based on – Select options from the drop-down.
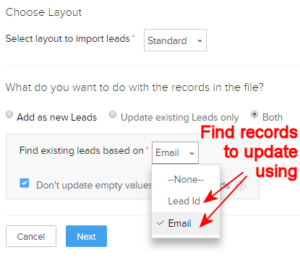 The first option will always be the [module name] Id This is the system-generated ID that Zoho has defined for the record. You cannot see the ID in any view. You can only see this ID when you export the records. So, if you export the records in some way and then update the field values in the spreadsheet, you can re-import the updated values into Zoho, matching on the module ID field.
- Any other fields identified as ‘unique fields’ will be displayed. For example, the Email field might be listed for Leads or Contacts. The Deal Name or Product Name or Account Name fields will be unique identifiers offered for record matching in those modules (though you may want to be careful if you haven’t been strict about unique naming). If you created an Accounting ID for the Account records, you could import revenue values based on that field. Unique fields are defined in Setup by selecting the field and editing the property to “Do not allow duplicate values”.
- If you select Update or Both, you will see the option for “Don’t update empty values for existing records”. You will want to leave this one checked. For example, leaving it checked means that if the record has a Mobile Number and the file that you are importing has a Mobile Number column, but you don’t have anything in it for selected records, it won’t copy the blank field onto the field that has data. Sometimes you may want to wipe out old values, but usually you will want to keep it checked.
- Click Next.
- Column labels in the file will display in the left column. The fields defined for the module will be displayed in the second column.
- Start by clicking the Apply Auto Mapping hyperlink at the bottom left of the screen. Zoho will do it’s best to match what it thinks are the correct fields.
- Review each of the selections in the second column for reasonableness. Use the drop-down to change any field links.
- Click the Unmapped button at the top of the screen to see any remaining file values that should be mapped. Use the drop-down to select the matching field.Map each of the Fields in file to the Fields in Zoho CRM.
- Any required fields in the database will need to be matched before proceeding.
- Notes:
- Whichever fields you selected in step 9 above, you will be required to map that field.
- If there are matching fields in the file, but you don’t want to use them to update any records in the CRM, don’t map them and those fields will remain untouched in Zoho.
- When mapping the Owner field, if you followed the instructions a few pages back for ‘Assigning Record ownership’ to update that field with the email of the User, then you should select Owner – Email as well for the mapping.
- Once you have completed all the field mapping, click Next.
- Click Yes, Continue to confirm that you know that some fields may be left unmapped.
 Final Options
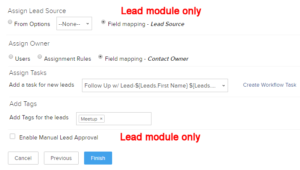
- Assign Lead Source: This is only available in the Leads module. It allows you to select an option from the Lead Source picklist. Alternately, you could have created a column in your spreadsheet for Lead Source and filled in the values for all records prior to selecting the file for import.
- Assign Owner: Select Users option to select the desired user from the drop-down list. Select Assignment Rule if you have created one. Assignment rules are good for assigning records based on conditions (State or Zip address fields, product interest fields, etc.). Or select Field Mapping if you created a column in the spreadsheet and assigned ownership with the user’s email login.
- Assign Tasks: You can select a Workflow Task to be launched against each record if you like. You can read more about creating Workflows in the Automation chapter. In the example above, a Task is created for each record in 3 days to follow up.
- Add Tags: Add tag to each of the imported records.
- Enable Manual Lead Approval option is only available when importing into the Leads module. If you check this option, an
- admin will need to manually assign users to each of the imported records.
Tips on Cleaning Up your Spreadsheets
Want more detailed instructions on how to get your Excel sheet ready for import? I have a detailed, 11-page guide on all of the different ways you can get your data ready for importing.
Happy importing.
Thank you Susan for the details and the VID!!
Here is my issue:
I am trying to upload New Leads but want to be able to separate them from the current ones – as they are from a different ´campaign´.
Original campaign is being done by Cold-Calls, this new one would be via ´EMAIL´.
Any suggestions….
Muchas Gracias
You could differentiate using a field, like Lead Source. Be sure that is one of the mapped fields from CRM to Campaigns.
Hi Susan,
When i try to import a list of products, only three of the four show up in Zoho. e.g my excel list shows the below
Product Code Product Name Unit Quantity Unit Price
The code and name always work however the other two are intermittent…..
I can’t see your Excel sheet, but Zoho usually shows you why the record didn’t import (the record was already in existence, a required field is missing, a field value wasn’t formatted properly, etc.). You can look under Settings, Data Administration, Import, click the Import History tab, and click the Skipped hyperlink to see why the records were skipped.
We would like to transfer our email addresses from constant contact but our mailing list is 11,000 +
Can we import that many leads all at once into the Zoho CRM?
Yes you can import that many, though you may need to break it into a couple of spreadsheets to import it.
Hello, when uploading leads in crm i have had my notes from previous leads deleted. How do i stop this form happening?
You are talking about a Note field. If you map a field (Phone, Name, Address, Description, etc), then it will overwrite/update whatever is in that field. There is no Append option. You can also opt to not map that field and it will not be overwritten. The Notes at the left are never overwritten.
Hi
When I am trying to update a few Zoho records, The CSV file is storing the Zoho ID’s like this 2.98342E+18. Could you please suggest the best way to prepare CSV file for updating records.
Thanks in advance
The best way to get the IDs is to generate a Backup and use the files from there. They have zcrm_ as a prefix and therefore the complete ID is intact and doesn’t fall prey to the scientific numbering problem associated with .csv files
I am not able to import leads or contacts suddenly. This issue started about 2 weeks ago. Did something change? I have never had an issue in the past.
There is nothing that has changed. Usually when an import fails you can click on the link in the email that Zoho sends you and you can see the reason why the import failed.
I have a customer who wants to set up his Zoho CRM. He said he wants to start with importing leads into Zoho CRM. I don’t know where from we have to start.
I would like to start Zoho CRM and Zoho Creator. what is the best way or best place where from I can start?
Start with importing the Leads. Use the instructions here or what you see in the YouTube video. Then you should be on our way.
Wonderful post however I was wondering if you could write a litte more on this subject?
I’d be very grateful if you could elaborate a little bit further.
Appreciate it!
You might pick up some more tips here in my YouTube Video on Importing:
https://www.youtube.com/watch?v=e0zLodFh79M
When will we be able to import into Activities? Wanting to be able to upload a csv of tasks and then import them.
I agree it would be great to be able to import activities, but it is not possible for now. We did write an elaborate custom function for another client that allowed them to do that, but it involves creating two new tables and some programming to make it possible on a regular basis. Sorry.
Hi, I am trying to import my contact list through an excel spreadsheet. First, it imports maybe 1/5 of the contacts. I’ve gone through the sheet and it should be fine to import all. Second, I want it imported in contacts only and it automatically imports it into accounts as well. How do I fix that?
Thank you.
After importing a list, you can go to Tools, Setup. Under Data Administration click Import. Click the Import History tab at the top of the view.
Click on the Skipped hyperlink. It will tell you in that view why the records were rejected. It is usually a missing value in a required field.
As to your second question, don’t map the Account name and the Contacts will be imported into their own records without being attached to an Account.
It took a while to configure correctly, ie. surveys were being input into contact, support tickets to leads, invoices would be duplicated, making a deal didn’t covert—
basically we have a lot of lead duplicates and contact duplicates. Now that we are ready for complete transition in my clinic from a hybrid mix with google to Zoho, I think we pretty much just need a fresh start. I know there is no button to move a contact to a lead. But can you export the contact list and then import to lead? Whats the chance risk we lose everything? Will it sync right?
You can export Contacts and reimport into Leads, but you will loose any related items (Notes, Activities, Attachments).But you may not have any.
How would i move accounts to contacts? I imported 2,000 contacts into accounts on accident 😀
If you have imported the records recently, you can “undo” the import. Click the Tools icon at the upper right.
Under Data Administration click Import; Click the Import History tab.
Point to the bad import and you will hopefully see a hyperlink to the right that says “Undo Import.”
If not, then you have to manually delete, which you could filter by creating a filter for all Accounts created on a specific Date and within a specific Time Frame.
Good luck
I have a lot of activities in the previous CRM… Hhow can I bring this so valuable data into ZOHO?
To bring in and attach activities from another CRM, you must “migrate” both of your contact and activities records the same way. If you import your Contacts, then there is no way to attach the activities. You must use the migrate option and you must migrate the contacts/leads usually within the same 30-day period in order for the activities to attach. There is no import options for activities…only migrate (Tools, under Data Administration click Import and there you will see your data migration options). Should you need help, we are glad to handle for you as we have done quite a few migrations for our customers.
Hi Susan
Any ideas how to import the deals into Z together with the products? What import does, it just creates deal entries with no product associations. We have a product info for each line. Please advise if there’s any possibility to maintain products during the import.
Sorry, I don’t believe that there is a way to do this. Alternately, you could create the associated product names as a note and import and connect the notes.
I am adding information by an import to Pipeline, I am trying to add the Potential owners name and not mine. I have added the owners email address and then tried their names, but nothing seems to work.
Elaine, when importing for multiple Users, be sure to check “Import My Organization Leads” mentioned in step 3. If you don’t do that, regardless of the email you entered, it will be imported as whomever is logged in.
One more question, when we upload the 2017 deals all historical data is over written. We want to keep 2016 deals and add 2017 deals–any suggestions?
Zoho determines duplicates for the Deals module via the Deal name. If it is the same name every year, then they will continue to overwrite. Consider updating the deal names to include the year.
Hi! We have updated the Account name to reflect the physician office business name for every Contact. When we upload the deals (using an excel spreadsheet), it duplicates every contact and changes the account name back to the physician name. Do you have any suggestions or tips?
Robyn, On the deal sheet that you are importing, do you have the Account name associated with the Contact and Deal? I am guessing that on your Deals records that Account is required, so it is using the Contact name if the Account name is not supplied.
Also, are the Contact Names in the spreadsheet an exact match to the contact names in Zoho? If not, that is why they are duplicating.
i have created a spreadsheet in which there are multiple organizers for a single conference and i would like to add these organizers separately in my contact list but they should be linked to the conference as well
Yash, Not exactly sure about what you are asking, but… could you add a multi-select picklist field in your database for ‘Contact Type’. It could have values like Prospect, Customer, Vendor, Consultant, Organizer, etc.
Then in the spreadsheet, add a column for Contact Type and add “Organizer” to the appropriate records. You can leave the other records blank or assign a value to them.
Alternately, you can add a column value to the spreadsheet of ‘Member Status’ and add values of ‘Attended’ and ‘Organizer’. Then import the list into a Campaign. This will associate the list to a specific campaign and also import into Leads (or Contacts). The Member Status displays in the Campaigns related list on each record.
Hi Susan, do you know of any template where I can upload accounts into Zoho? I have a big list of apartments which are my potential customers. Thanks!
Bryan, There is no need for a template. When you click the Accounts module, you will see the Import button at the top right. You will be guided on mapping the fields. Run through the video again and it will help you with understanding how to easily manage the import. If not, give me a shout and we can do it for you. Would take us less than 30 min so wouldn’t cost much. Use this link to schedule a Quick Consulting Chat appointment and you could watch us do it so you would know how the next time. https://susanclark.appointlet.com/
I’m wanting to import contacts along with their corresponding account information. I have a spreadsheet that includes account name, account type, website & address, as well as the contact name, title & contact info. I thought I did this once before, but don’t see how to get info onto the account record.
The way to do this is to import the Contacts. When completed, use the same list to import into Accounts, using the Overwrite option, finding duplicates on the “Account Name” field. Then map the Account fields that you wand to use to update the Account records. This will work if there are unique Account Names. It won’t work if you have ABC company in Houston and another ABC company with the same name in New York. If you have that situation, then you are better off using the migrate option (Tools, Setup, under Data Administration click Import). Migrate is a more complicated way of getting data into Zoho, but is the only way to handle the situation with duplicate account names that are really different companies.
when selecting my contact file to import, the system doesn’t do anything and the file search box stays blank. my file is in CSV format and it is not over 1000 lines. what do I need to do?
Try using a different Browser (Chrome or Internet Explorer). Also be sure to open the file in Excel first to be sure that the formatting is correct (sometimes when saving as a .csv file, the person chooses the wrong file type, so Excel can’t read it.) Good luck.
Hi Susan,
I’m hoping to add some additionally gathered data to my existing contacts. If I try to import these, will the system be smart enough to recognize the name of the contact and add the additional information in the relevant fields? Or is it best to export all data, edit the spreadsheet manually and reimport everything?
Any tips appreciated.
Thank you! Patrick
Zoho CRM recognizes duplicate Contacts (or Leads) by the email address. It will update contacts where the email address exists and add new records where the email is not found or does not match.
hope you can help? I’ve just started using Zoho. In my spreadsheet that I’m am importing into zoho potentials I have a column Values which is to mapped to the field Amount in zoho. however, when I import it skips all values over £1,000? Not sure if i’ve given you enough information to assist.
Retha,
When importing into number fields be sure to change the data column in the spreadsheet to General (no commas and no currency symbols).